Storing Data in the Document Server
The Document Server enables you to store documents in the memory and print them as you want.
![]()
Data stored in the machine might be lost if some kind of failure occurs. The manufacturer shall not be responsible for any damage that might result from the loss of data.
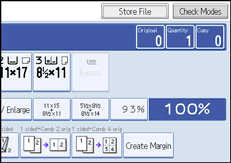
![]() Press [Store File].
Press [Store File].
![]() Enter a file name, user name, or password if necessary.
Enter a file name, user name, or password if necessary.
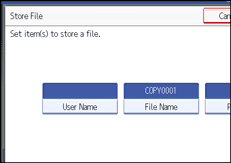
![]() Press [OK].
Press [OK].
![]() Place the originals.
Place the originals.
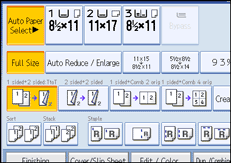
![]() Make the scanning settings for the original.
Make the scanning settings for the original.
![]() Press the [Start] key.
Press the [Start] key.
Originals are scanned and stored in memory.
![]()
To stop scanning, press the [Clear/Stop] key. To resume a paused scanning job, press [Continue] in the confirmation display. To delete scanned images and cancel the job, press [Stop]. The originals placed in the ADF are delivered.
When placing an original on the exposure glass, press the [
 ] key after all the originals have been scanned.
Data stored in the Document Server is set to be deleted after three days by the factory default. You can specify the period after which the stored data is deleted automatically. For details about changing settings, see “Auto Delete File in Document Server”, General Settings Guide.
To check if the document has been stored, press the [Document Server] key.
If you want to store another document, do so after copying is complete.
For details about the Document Server, see “Document Server”.
For details about printing stored documents, see “Printing a Stored Document”.
For details about setting user name, file name, and password, see “Storing Data”.
Depending on the security setting, [Access Privileges] may appear instead of [User Name]. For details about specifying [Access Privileges], consult the administrator.
![]()
See Storing Data
 .
.