Staple
Each copy set can be stapled together.
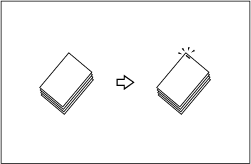
![]()
You cannot use the bypass tray with this function.
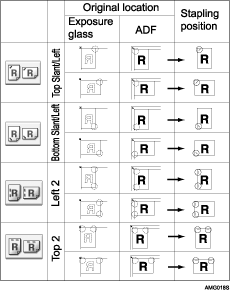
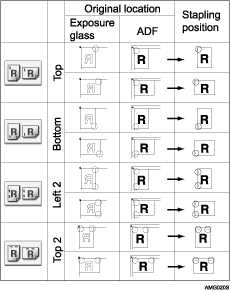
Stapling position and original setting
Place all the originals in the ADF in the orientation in which they can be read normally. When placing the original on the exposure glass, keep the same orientation, but set the original facing downwards. When there is copy paper that is identical in size and orientation to your original, the staple positions are as follows:
500-sheet finisher
1000-sheet finisher
Booklet finisher
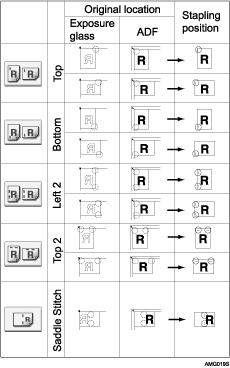
This table shows the stapling positions, not the orientation of delivery.
Left 2![]() and Top 2
and Top 2![]() are not available for larger than A4 size paper.
are not available for larger than A4 size paper.
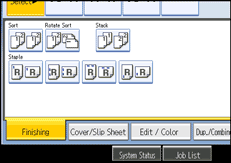
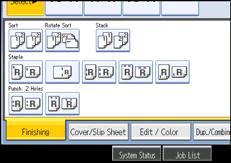
![]() Press [Finishing].
Press [Finishing].
![]() Select one of the stapling positions.
Select one of the stapling positions.
500-sheet finisher

1000-sheet finisher
Booklet finisher
When you select a stapling position, Sort mode is automatically selected.
![]() Enter the number of copy sets using the number keys.
Enter the number of copy sets using the number keys.
![]() Place your originals, and then press the [Start] key.
Place your originals, and then press the [Start] key.
![]()
When placing an original on the exposure glass, start with the first page to be copied. When placing an original in the ADF, set so that the last page is on the bottom.
When placing an original on the exposure glass or in the ADF using Batch mode, press the [
 ] key after all the originals have been scanned.
See “Select Stapling Position”, General Settings Guide.